Measuring pressure in single-use systems (SUS) has become an integral part of both upstream and downstream bioprocess operations. Articles have been published on filtration applications (1), and integration into other SUS has been widely adopted. Additionally, information is available on low-pressure applications such as how to prevent overpressurization in single-use bioreactors (2).
However, as users and applications both become more sophisticated, improved performance is sought for low-pressure applications (<1 psi) such as in single-use bioreactors. The reasons are two-fold: First, more information can be gleaned through improved accuracy in measuring a SU process condition. Second, with improved performance, useful applications such as leak testing and pressure hold can be better evaluated for implementation in SUS by using a sensor installed on a given system for in-process monitoring.
Single-use pressure sensors such as PendoTECH sensors have a specification of ±2% of reading. After a 10-minute warm-up of the electronics for best performance, followed by a tare relative to atmosphere, a sensor will read 0.00 psi when using a standard PendoTECH PressureMAT monitor. However, normal electrical variations within optimized, standard monitors that can read to 75 psi (to cover all applications) can contribute to a value referred to as “zero offset stability” or ZOS of ±0.03 psi. In a filtration application, a ZOS contributes negligibly to the error of a reading, and in many cases a user decides to not even display the second decimal place of 1/100ths. However, in a low-pressure application, where readings on the order of 0.1 psi are designed to be measured accurately, a ZOS error of 0.03 psi constitutes a high percentage of error. Therefore, improved resolution is desirable.
Using a pressure-hold test to detect leaks is a well-established practice. In the bioprocess arena, it is the basis of some filter-integrity test methods for measuring a rate of diffusion through a wetted membrane and release testing on single-use bags. When a single-use sensor is used for a pressure-hold test to leak-test a complex and costly setup such as a single-use bioreactor, a ZOS of 0.03 psi could limit applicability.
Some background on the basis of the pressure-hold test takes us back to Boyle’s Law and Charles’s Law from the 17th century and 18th century, respectively. They were later combined and stated as the Ideal Gas Law. It describes the behavior of a gas under certain conditions and is represented by the equation
PV = nRT
where the letters denote absolute pressure, volume, amount (in moles), ideal gas constant, and absolute temperature of the gas.
In a pressure-hold test, the system’s volume and temperature are held constant. That means that as the pressure decreases, n also drops as gas leaves the constant volume container. That can be readily converted to a leak rate by converting the ΔP in the system to ΔV at room conditions and applying the time over which the ΔP occurred and the known system volume:
Rate = (ΔP × Vsystem)/(test time × Patm)
That equation yields units of volume per unit time. There are two important factors to consider when applying this method to critical applications: The measured pressure is relative to atmospheric conditions at the time a sensor was tared, and temperature is directly proportional to pressure; any change will be interpreted as change in pressure.
For a short test time the effect of a change in atmospheric pressure would be minimal, but for a longer leak-test time, atmospheric pressure changes may come into play. For instance, a barometric pressure change of 20 mbar during impending weather could be interpreted as an increased pressure in the system being tested (or mask a pressure drop). Regarding shipping of a container under slight positive pressure and a monitor with the tare stored to a higher elevation, the container will experience an increase in pressure dependent upon altitude. For example, at 5,000 ft of elevation, the absolute atmospheric pressure is 12.2 psi (14.7 psi at sea level).
The impact of a change in temperature can be illustrated simply by using the ideal gas law. A vessel might be placed close to an air-vent outlet so that the building climate-control system could alter that vessel’s air temperature beyond normal temperature variations. Using an absolute temperature of 293 K, a 3 °C shift can contribute a 1% test error.
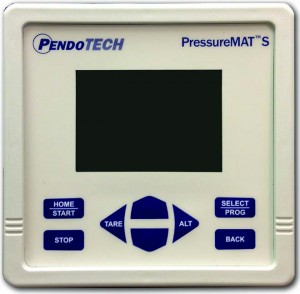
So the question is whether a single-use sensor that is already being used on a SUS can measure pressure with sufficient accuracy to optimally measure process performance and be sensitive enough to measure a leak rate. To address the low-pressure application requirement, PendoTECH developed a modified version of its PressureMAT monitor for single-use sensors. This version is designated as the “HR” model for “high resolution.” By contrast with the standard monitor that can read to 75 psi, the HR models have been modified and optimized for low-pressure measurements to 7.5 psi (~0.5 bar). That is more than adequate for low-pressure applications, and the ZOS is reduced to <0.003 psi. An important point is that HR models function with standard PendoTECH single-use pressure sensors, and only the PressureMAT monitor electronics have been modified and optimized for the low-pressure reading. The HR models have the same features of standard models such as 4–20 mA analog outputs for integration to a user’s control system, alarm relay outputs, and serial data output for connection to a PC-based data acquisition system.
A study was undertaken to verify the accuracy of the combined PMAT HR with standard PendoTECH single-use pressure sensors after they had been exposed to two typical levels of gamma irradiation. The results of that study follow (see the Materials and Methods box).
Materials and MethodsMonitor |
Irradiation
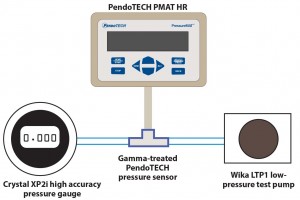
Thirty sensors from three different lots were randomly selected and subjected to two levels of gamma irradiation: 27.5–33 kGy (low) or 40–45 kGy (high). Five sensors from each lot were treated at the low level and five at the high level. Sensors were sent for irradiation in their standard individually packaged pouches. The sensors were then shipped to PendoTECH in their sealed bags for testing with the PMAT HR. Figure 1 shows the testing setup.
Testing Process
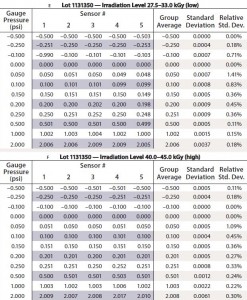
Using the Wika LTP1 low-pressure test pump in conjunction with the Crystal XP2i high-accuracy pressure test gauge, the sensors were subjected to vacuum at –0.50, –0.25, and –0.10 psi and then pressurized to 0.05, 0.10, 0.15, 0.20, 0.25, 0.50, 1.00, and 2.00 psi. The pressure displayed on the PendoTECH HR pressure monitor was recorded at each pressure or vacuum level, and results were compared with that from the Crystal gauge.
Results
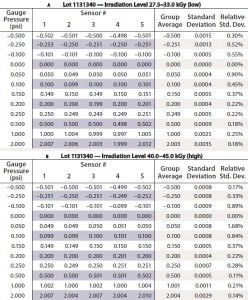
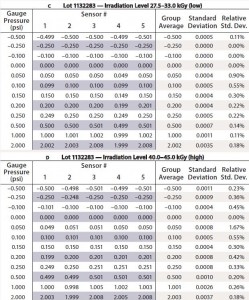
Table 1 (a–f) reports the testing results after applying a known pressure/vacuum to each sensor from all lots exposed to both irradiation levels. The averages, standard deviations, and RSDs are calculated and reported for sensors grouped by lot and irradiation level. These results show that group averages, measured to three decimal places, are nearly identical to the applied pressure. The accuracy specification of the sensors is ±2% of reading plus the 0.003 psi ZOS. Looking at the data in Table 1, all of the data points on the 30 sensors tested meet that accuracy specification. The statistics also demonstrate the precision of the performance.
For potential use in a pressure-hold/leak-test application, the contribution of the 0.003 psi ZOS can be calculated by the following example. Populate the formula based on testing a SUS with an approximate bag volume of 1,000 L for converting pressure hold to leak rate from
Rate = (ΔP × Vsystem)/(test time × Patm) = (±0.003 psi × 1,000 L)/ (10 min × 14.7 psi) = ±0.020 L/min
So during a potential test, you could expect to see a potential fluctuation of ±0.003 psi corresponding to a value of ±20 mL/min during the test that would not be interpreted as a leak. This rate value would go up or down proportionately with larger or smaller containers. This ZOS factor would need to be considered for any test design. And relative to the single-use systems having a constant volume (V), a settling time should be considered before the final tare to achieve rigid position of the somewhat flexible components.
High Accuracy at Low-Pressure
Leak-testing/pressure decay on single-use systems with air is feasible by applying the ideal gas law as long as a pressure sensing device can measure to the accuracy required for a low-pressure system such as in single-use bioreactors and storage bags. The commercially available inSITE inflation and integrity test system from Advanced Scientifics, Inc. can automate that type of test. The data presented here support that the PressureMAT HR monitor with the PendoTECH single-use pressure sensors provides excellent experimental results for high-accuracy pressure measurement in the range of –0.500 to 2.000 psi. Furthermore, the data show that two typical levels of gamma irradiation make no significant difference in the accuracy or consistency of results. The increased resolution of the PressureMAT HR by 10× over the standard monitor reduces the error of a low-pressure process measurement and improves its capability for leak testing in SUS. And finally, at low-pressure levels, to prevent false results during any type of pressure hold test, atmospheric pressure changes or localized temperature variations must be taken into consideration.
References
1 Bink LR and Furey J. Using In-Line Disposable Pressure Sensors to Evaluate Depth Filter Performance. BioProcess Int. 8(3) 2010: 44–49, 57.
2 Application Note: PendoTECH Single- Use Pressure Sensors for Single-Use and Glass Bioreactor Monitoring and Control; www.pendotech.com/products/BR_pressure_control/ Application_Note-PendoTECH_Pressure_ Sensors_For%20Bioreactor_Monitoring_and_ Control.pdf. c
Corresponding author Dennis C. Annarelli is technical manager, and Jim Furey is general manager at PendoTECH , 174 Nassau Street, Ste. 256, Princeton, NJ 08542; dennis@pendotech.com. Benjamin Less was an engineering intern at PendoTECH when this testing was completed (he is now a control systems engineer at Thermo Systems LLC). Joshua Huang is an engineering intern at PendoTECH and a student at Rutgers University.

